What happened here?

All About Showing Off, This is why we do what we do.
F.C.
Posts: 560
Joined: Sat Jun 04, 2011 10:28 am

Re: What happened here?

Post by F.C. »

mite5255 wrote:Hi Frank. How about we all rock up at your shed and you play teacher :D :D

Mike

BRING IT ON!! HAHA... I'd love to have you guys over for a visit anytime. I'm an open book on this stuff (as you probably can tell already) and I give freely of it to help keep the knowledge alive as there are few individuals left in this world that can do all the tasks of patterns, molding and foundry casting together and have it mastered enough to be a one man business... not to mention designing and creating one's own tools!! :D
mite5255
Posts: 1740
Joined: Thu Jun 02, 2011 1:11 am
Location: Caboolture Qld Australia

Re: What happened here?

Post by mite5255 »

How many cartons of Aussie brew will I need to bring :lol: :lol:
Mike
When life gets tough, remember: You were the strongest sperm :)
Rasper
Posts: 630
Joined: Sun Aug 07, 2011 4:05 pm
Location: Huatulco, Oaxaca, Mexico
Contact:

Re: What happened here?

Post by Rasper »

I cast some test pieces today. I burned out the investment in the kiln for 48 hours. I still got a little bit of that rash, nowhere near as bad though. I have to assume that my initial brush on investment layer is at fault and is holding wax residue. I ran some test pours of Styrofoam cups recently and they burned out clean with no rash. The next step is to cast the same objects and use a brush on investment mix of plaster with fine brick dust replacing the 200 mesh silica flour.

Richard
F.C.
Posts: 560
Joined: Sat Jun 04, 2011 10:28 am

Re: What happened here?

Post by F.C. »

Right there may be the problem you were having, the 200 mesh silica flour. That is some very dense material once it sets up, and would resist release of melted and burnt wax gases to escape. Basically it would wick its way deep into the mold then react violently when the 2000 degree melt enters the cavitiy. I don't know the tecnical term what it's called but I refer to it as developing a vapor lock inside the mold. This happened to me on a couple occasions due to inadequate gating and venting, lack of proper investment composition, and running my temp up too fast in the kiln during burnout. I learned (by accident) how to fix some of the issue while it still sat in the kiln. Inadvertently I accidently put the wrong bottle of propane on which didn't have sufficient volume to continue the burn, when it run out, during the switch over, I noticed my kiln was smoking heavily with wax smoke. That shouldn't have been because the mold was sufficiently heated and was up to 1000 degrees at that point and no vapor whatsoever was emmitting from the kiln while it was running prior to it shutting off. I watched as that mold continued to smoke like crazy till it subsided (about 20 minutes), then I fired back up and finished the burnout. Once cast with metal the inside of the mold cavity and the cast, itself, looked great. On another occasion I was doing yet another burn and ran it continuous till I was satisfied with temp and length of time in the kiln. When I shut down the kiln, lo and behold the mold began smoking considerably, but not as badly as the previous one did. I went ahead and poured that mold anyway just for sake of experimentation. Damned if it didn't cause some facial blemishes (smilar to yours) that took considerable time to work out. There on, every time I do a burnout I allow the mold to get to temp on my regular determined schedule of increase of temperature, then when it holds at 1000 degrees for an hour, I shut the kiln off and watch the mold to see if there are any signs of wax beginning to offgas and burn from within the mold. It's way easier to watch a few minutes and see if it may have developed a vapor lock, then fire back up being assured there wasn't and the mold's condition is sound, than pull it and pour taking a chance you won't be satisfied with the result. That's my experience, anyhow, on unburnt wax residue inside a mold. It can have a detrimental effect of finish quality.
Rasper
Posts: 630
Joined: Sun Aug 07, 2011 4:05 pm
Location: Huatulco, Oaxaca, Mexico
Contact:

Re: What happened here?

Post by Rasper »

That, F.C., is some very interesting information. I will try that.

I invested the same test objects today using a brush on mixture of 2 parts finely sieved brick dust to 1 part plaster, the second coat having chopped fiberglass strand.

Tomorrow I plan to invest another test, this time using a mix of 1 part plaster, 1 part brick dust, 1 part 200 mesh silica flour.

In all of these I then pour the investment with 1 part plaster to 2 parts ludo. I add some fresh brick dust to the ludo periodically. I am quite happy with that. It breathes well and is strong enough.

Richard
Rasper
Posts: 630
Joined: Sun Aug 07, 2011 4:05 pm
Location: Huatulco, Oaxaca, Mexico
Contact:

Re: What happened here?

Post by Rasper »

I have the test pieces that are coated with the brick dust/plaster mix in the burn out kiln as I write. The next test with the silica flour, brick dust and plaster is invested and waiting to go in the kiln. I am also going to make one using the silica flour/plaster mix but pour it at lower temperature. We will see.

Richard
Rasper
Posts: 630
Joined: Sun Aug 07, 2011 4:05 pm
Location: Huatulco, Oaxaca, Mexico
Contact:

Re: What happened here?

Post by Rasper »

Today F.C., I was getting ready to pour the latest test. I turned off the burner in the kiln, opened it, but in just a few minutes a little bit of white smoke started coming out and I began to smell a strong odor of burning wax. There was no odor at all before I opened the kiln. So I closed it back up, fired up the burner, and will pour tomorrow instead.

Richard
F.C.
Posts: 560
Joined: Sat Jun 04, 2011 10:28 am

Re: What happened here?

Post by F.C. »

Question... what does your kiln look like, how does the flame enter, how does it traverse through the inner chamber, how does it exhaust? Also, how do you bring your molds up to temp, i.e., how long do you hold your mold at 500, how long do you allow it to increase to 600, then take to reach 750, then take to reach 900, then 1000, then how long do you hold it at that temp, normally, till you shut down the kiln? Do you also cover the exhaust and intake to allow the temperature to subside as slow as possible or do you simply shut down then let it cool without restricting its descent? Many factors are involved in burning out a mold correctly with the investment you've chosen to use. The more I can see what it is you're doing the easier it would be for me to offer some additional input that I'm sure will be of benefit on future work. Glad you experienced the unburnt wax in this manner... maybe I can assist you on dialing in your means and methods to where ALL your pieces will cast with optimum result.
Rasper
Posts: 630
Joined: Sun Aug 07, 2011 4:05 pm
Location: Huatulco, Oaxaca, Mexico
Contact:

Re: What happened here?

Post by Rasper »

Here is my kiln. This is the base:

Image Image
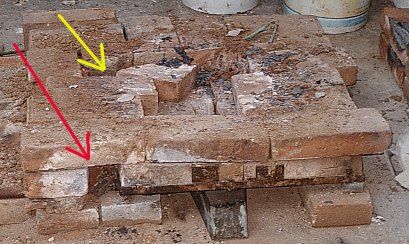
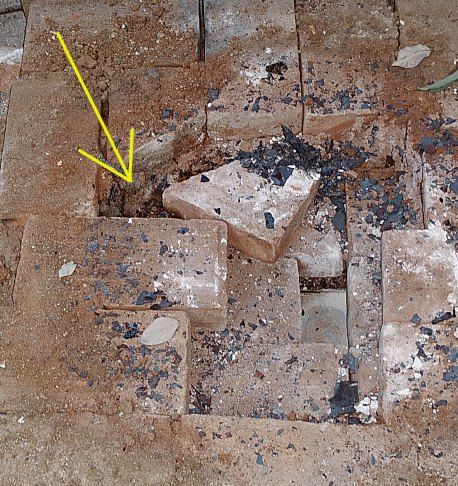
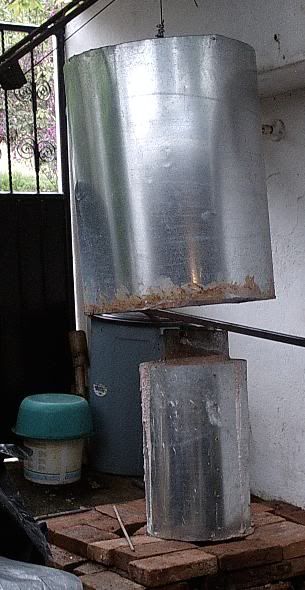
The red arrow indicates the burner hole. The yellow arrow indicates where the heat enters the kiln. there is a wax drip hole you can see with a pan of water under it. The kiln body is a 55 gallon drum covered with 2 inches of ceramic wool, an overcoat of sheet metal, and a 5 inch vent hole in the center of the top.
Image
I remove the sheet metal flask from the investment before I burn it out. The investments are reinforced with expanded metal plaster lath which holds them together well.

I generally begin firing at a low flame (propane burner) for several hours to melt the wax. Then I turn it up to a flame that will eventually get the temperature to 1200 F. It takes maybe five or six hours for the kiln to reach that temperature. Then after I have burned it out at 1200 F, I turn off the gas, cover the top vent hole, and fire up the melting furnace. I lift off the kiln a few minutes before the melt is ready to pour so the investment is at least 1000 F when I pour it.

To save fuel, these smaller test pieces I have been doing recently are not burned out in the kiln, but in my large furnace. I place the gas burner in the tuyere, and use a piece of roof tile to deflect the flame around the investment which is elevated off of the furnace floor with a few pieces of broken bricks.

Richard
F.C.
Posts: 560
Joined: Sat Jun 04, 2011 10:28 am

Re: What happened here?

Post by F.C. »

Interesting and reasonably effective looking kiln foundation you have. I don't believe there is any issue with its construction, although, there is considerable room for improvement to minimize flame contact with your investments that otherwise will create hot spots and uneven heating causing mold cracks and flashings on your casts and to keep your heat optimally entirely "inside" your furnace surrounding your investment.

Your mention of the time it takes (5 to 6 hrs) to get your molds up to temp (1200 degrees) is considerably too quick and unnecessarily too high. The time period you're attempting is liken to shell casting methods, an entirely different investment medium which is coated on much thinner and can handle that extreem increase in temperature.

My method to burn out a mold the size you created would be as follows: 400 - 500 degrees (idle for 4 hrs)..., increase temp gradually (every hr) 50 degrees until 1000 degrees is obtained, then hold at that temp for two additional hours.... then reduce temp of the kiln by 250 degrees each hr. until 250 degrees is obtained, then turn off kiln, ... fire up melt furnace. This takes 18 hrs to accomplish, typically with more than one person taking a turn at checking in on the kiln and making adjustments. I, personally, do it myself without aide. I typically fire the kiln around 5:00 pm, set my alarm to notify me every hour or so to go make a check and new adjustment to hold that baking temperature range. Once that initial 4 hrs are up (this is typically where any reclaimable wax will be generated), I commit to an hourly watch to make the additional 50 degree increment adjustments until the burnout reaches 1000 degrees. Then I take a two hour nap, awake and begin the cycle to reduce the temp every hour by 250 degrees. By 8:00 am the following morning my mold is chalk white inside and out and without cracks whatsoever, it is not only burned out entirely but chemically there is absolutely no moisture or combustible, or reactory substance whatsoever inside that mold. Within an hour from when I fire up my melt furnace those molds are easily managable and assuredly moisture proof and sufficiently warm inside and ready to receive hot metal. Metal going in when poured rises nicely inside and actually stays liquid awhile before chilling. This creates beautiful casts in my experiences and personal opinion. It costs a lot on propane, indeed, but... if it's a piece you're intending to sell or are doing on commission you need to add that cost to recover the fuel it takes to accomplish good work. A kiln redesign may save you considerable fuel, as well, which is something you may decide is worth considering.

Frank
Post Reply