Casting Aluminum Brackets for Kayak

Re: Casting Aluminum Brackets for Kayak
I don't know about anyone else, I'm not getting a picture. I've had this on some other threads also. Updated the browser and still not getting them.
quando omni flunkus moritati 
Re: Casting Aluminum Brackets for Kayak
yea it is broken for me too... but I fixed it...
Re: Casting Aluminum Brackets for Kayak
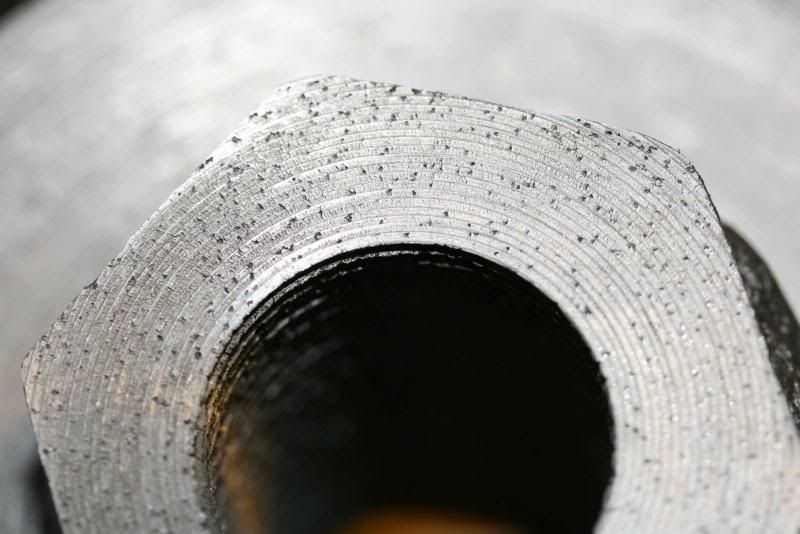
Great job on make'n something ya cast work for what you need. Those casts, however, are full of porosity. Are you interested in learning how to eliminate those defects?
Re: Casting Aluminum Brackets for Kayak
I'm going to ask how as I still have problems with gas porosity.
like this
like this

David and Charlie aka the shop monster
If life seems normal your not going fast enough" Mario Andrette
If life seems normal your not going fast enough" Mario Andrette
Re: Casting Aluminum Brackets for Kayak
INDEED.... wow.... First and foremost I need to see how you gated the piece. Second, I need to know what your sand mix was... not just composition but percentages of binder, water and sand as a ratio of various componets of solution. BRING IT!!! Inquiring minds need to know...  I also need to know what fuel you use to fire your furnace, how your furnace works (i.e., where the flame enters the crucible and how it interacts with the inside of the furnace wall, gas, oil or coal, and the list goes on, and on, and on..... heh, heh... Don't panic though.... as much as this information is critical it's also somewhat overboard with regard to getting a decent cast product on a small scale. It all plays a factor in the final product thought... REALLY. What it looks like to me, from the initial view of the picture, is that your melt has been too exposed to the FLAME and your furnace interior is not designed as it needs to be. There are ways to subtract "some" of the flame effect by use of purging chemicals prior to pulling the crucible and pouring the mold. In essense... de'gass your melt before pouring. I'll bet this is the problem you have in that photo. Fix the furnace, then Iron out the other issues and you'll cast far better product time after time therafter (assuming, of course, your sand mix is proper).
Re: Casting Aluminum Brackets for Kayak
Let me put it in more simplier terms... "casting metal is kinda-sorta-like play'n the fiddle". Draw'n the bow across a fiddle's string does "NOT" produce music. To produce music out of a fiddle one must "FIRST" learn how music is composed, then how to interpret notes pertaining to instruction of music and its composition, etc. THEN... one must learn how to "HOLD" a fiddle, how to breath, in conjuction with how to manipulate the supporting hand's fingers while manipulating the strings, TO INCLUDE... how to coordinate the other hand manipulating the bow across the strings while in a full body orchestration compiling everything learned and mastered to perform a simple song as "Mary Had A Little Lamb". From there it takes PRACTICE, PRACTICE, and MORE PRACTICE till you figure out how to manipulate what you know to produce the audible product you hope some day to perform. Casting metal is no differnt, really. It involves an abundance of prepatory work, systems and checks put in place, the correct sand mix, the correct furnace performace, the correct gating, reservoirs or chills as needed, mold manipulation (if required), not exclude "how" the melt is introduced to the mold. Gagging a mold is VERY important, including melt temperature, degassing if required, and/or upsets necessary to provide the necessary head pressure to force melt into a difficult narrow mold cavity. EVERYTHING you do, or DON'T DO, will have an effect on your cast product.
Chances are the defects in casts you're experiencing is the result of lack of understanding of the connection each singular aspect has with the overall process. You can train a person to play a violin, but, hand them one out of tune and they cannot play music till it's "BEEN TUNED". And based on the instrument, it may only allow for a limited quality of sound... likewise with the equipment and sand mix you choose to use in casting metal.
FYI... I CANNOT FIX yours, nor anyone else's issues by virtue of some "secret" tidbit of advice... I have to begin from the beginning, the same way I was taught, i.e., "wax on, wax off, grasshopper..." Build the foundation correctly, the house constructed on top of it will surely stand against the elements more effectively.
I know you guys are proud of your sand mixes... sure, it took some effort and cost to acquire it, add to it, even work it and get used to it. Might just be there's nothing wrong with it. Might just be you ignored what constitutes a proper furnace operation, or are utilizing a metal crucible instead of a proper one. Might also be you're lacking in knowledge on how to gate properly, or overlooking the need for head pressure and have no idea how to create it in a mold. There is a SHIT LOAD of knowledge you need to be aware of and get your head around to be able to diagnose your own defects. It takes learning, and it takes applied experience. Most important, it takes drop'n your ego and try'n something outside what you're used to in order to see the benefit. Jus' say'n...
FYI... I'm writing a book on the subject of metal casting and operating a small commercial foundry. As I write the book I will share with anyone on this site willing to listen and experiment as the book developes. There will be over 20 years experience referenced and included in the book in practical step by step instructions y'all can either adopt or thumb your noses at by your own will. Matters not to me. I DO NOT have the issues you guys experience in your casts because I grew out of those bad habits years and years ago. I was taught over a two year span of time by a retired professional foundryman everything I know with regard to casting bronze and aluminum. What I learned I applied commercially for 20 years earning a healthy income for my family. Some of what I know has been self taught with regard to stretching the envelope with what I already learned. This has enabled me to tackle unusual projects with great success.
Like I said, I will always go out of my way to assist anyone here overcome some issue with their processes, but it's important for you all to know your processes will have to change in order to overcome the difficulty. It's that simple.
Fc
Chances are the defects in casts you're experiencing is the result of lack of understanding of the connection each singular aspect has with the overall process. You can train a person to play a violin, but, hand them one out of tune and they cannot play music till it's "BEEN TUNED". And based on the instrument, it may only allow for a limited quality of sound... likewise with the equipment and sand mix you choose to use in casting metal.
FYI... I CANNOT FIX yours, nor anyone else's issues by virtue of some "secret" tidbit of advice... I have to begin from the beginning, the same way I was taught, i.e., "wax on, wax off, grasshopper..."
I know you guys are proud of your sand mixes... sure, it took some effort and cost to acquire it, add to it, even work it and get used to it. Might just be there's nothing wrong with it. Might just be you ignored what constitutes a proper furnace operation, or are utilizing a metal crucible instead of a proper one. Might also be you're lacking in knowledge on how to gate properly, or overlooking the need for head pressure and have no idea how to create it in a mold. There is a SHIT LOAD of knowledge you need to be aware of and get your head around to be able to diagnose your own defects. It takes learning, and it takes applied experience. Most important, it takes drop'n your ego and try'n something outside what you're used to in order to see the benefit. Jus' say'n...
FYI... I'm writing a book on the subject of metal casting and operating a small commercial foundry. As I write the book I will share with anyone on this site willing to listen and experiment as the book developes. There will be over 20 years experience referenced and included in the book in practical step by step instructions y'all can either adopt or thumb your noses at by your own will. Matters not to me. I DO NOT have the issues you guys experience in your casts because I grew out of those bad habits years and years ago. I was taught over a two year span of time by a retired professional foundryman everything I know with regard to casting bronze and aluminum. What I learned I applied commercially for 20 years earning a healthy income for my family. Some of what I know has been self taught with regard to stretching the envelope with what I already learned. This has enabled me to tackle unusual projects with great success.
Like I said, I will always go out of my way to assist anyone here overcome some issue with their processes, but it's important for you all to know your processes will have to change in order to overcome the difficulty. It's that simple.
Fc
Re: Casting Aluminum Brackets for Kayak
Frank,F.C. wrote:INDEED.... wow.... First and foremost I need to see how you gated the piece. Second, I need to know what your sand mix was... not just composition but percentages of binder, water and sand as a ratio of various componets of solution. BRING IT!!! Inquiring minds need to know...
that part was cast using propane for fuel, in a liftout furnace not sure which one I used its been a while since I made that part. the problem still exist thou. I try to run as clean a flame as possible as I know propane generates water in the furnace which is death to aluminum.
I use a commercial degasser but most of the time it seems to do little to get rid of the porosity problem.
all my melts are in standard crucibles, some melts I do add copper to but haven't really seen any advantage to doing so, as I never see any difference in the way the metal machines, but then again I may not be adding enough of it to the melt.
I try to run my furnace's when melting aluminum so that the exhaust temp is around 1350 F.
I don't remember what the weather conditions were that day, probably hot as the part was poured back in the summer. and the metal I used was probably a mix of some that had already been melted and some car wheel that hadn't been melted. thats one reason for the porosity being so bad.
What I know about this hobby is what I have learned by reading and doing. not to many people around that do casting.
thanks in advance for the help. looking forward to your reply.
and I almost forgot the sand, I use oil bonded sand that I mix myself using as little oil as possible.
David and Charlie aka the shop monster
If life seems normal your not going fast enough" Mario Andrette
If life seems normal your not going fast enough" Mario Andrette
Re: Casting Aluminum Brackets for Kayak
Couple or three things you can do...
From what I see, the picture speaks clearly that the pepper flake gas bubbles throughout your piece (i.e., soluble hydrogen) is a sure sign of overheating of the melt in conjunction with an improper flame in the furnace. All aluminum will develop a certain amount of gas when melted. Melting contaminated scrap or aluminum with high contents of magnesium or manganese will aide in creating and compiling gas problems. The ideal is to keep your furnace as close to the melting temp of the aluminum as possible and not overheat. Also, you need an "oxidizing" flame, not a "reducing" flame. A reducing flame will force the metal to take on more gas in its matrix than it normally would. Also, degassing does not work well "outside" the furnace. I do mine inside the furnace when I know I'm slightly above pouring temp (with the flame off). After skimming, I lift the crucible and pour. You want your metal to pour like cream milk, not like mercury. There should be a sleeve formed at the lip of your crucible down to the pour cup that the aluminum flows through, this is evident you at that most perfect pouring temp.
Proper gating is also critical in eliminating gas or air bubble entrapment. If your sand mix has too much binder then the sand mold cannot absorb any off gassing of the melt introduced and becoming chilled. Situations like this will generally cause surface gas inclusions. What you have in that picture, however, is evident of soluble hydrogen spread throughout your entire melt. You get that occurring with a reducing flame and heating too hot.
Not sure if you are aware (and hopefully you're not color blind) but aluminum gives off a very subtle (barely noticeable) pinkish hue when the melt is at it's maximum temp you dare bring it to inside the furnace. Also, do not skim your melt while the furnace is running, nor skim after each ingot of scrap you drop into it once it melts. Leave the skin on till you're ready to degas and remove the skin... i.e., right before you pull the crucible and pour. When you pull the crucible there should still be that pinkish hue to the melt (not talking about the crucible here, only the melt). If it's still got that hue, sloooow down. Relax... take your time. That hue will disappear quick enough and at that point make your pour. Still, don't rush. If your gating and sand are right, and you've had a proper flame inside the furnace during the melt, chances are you will not need to degas. If you feel you have to degas due to a variety of scrap you've been melting use this... go to the grocery store and buy a couple of them "blue" toilet bowl cakes that turn your toilet water blue. Break off a thumbnail size piece and insert it into the end of a perforated length of steel thin wall pipe attached to sturdy metal rod stock. While the melt sits in a glowing hot furnace, insert the perforated pipe through the melt's surface skin and gently swirl it about. It will boil vigourously and emit smoke and the smell of spent firecracker powder. Breath shallow, or wear a respirator, or do this with some cross ventilation. When the boiling and bubbling stops, skim, lift the crucible and, if there's no pinkish hue, go ahead and pour.
Other than that, I recommend you determine whether you have too much binder and/or oil, in your sand. Often people with limited experience in making sand molds will keep adding binder till their sand packs firmly like clay. Yes, it gives them nice molds that don't damage that easily but it plays hell with the melt once entered inside the mold cavity.
Frank
Re: Casting Aluminum Brackets for Kayak
FrankF.C. wrote:Couple or three things you can do...
From what I see, the picture speaks clearly that the pepper flake gas bubbles throughout your piece (i.e., soluble hydrogen) is a sure sign of overheating of the melt in conjunction with an improper flame in the furnace. All aluminum will develop a certain amount of gas when melted. Melting contaminated scrap or aluminum with high contents of magnesium or manganese will aide in creating and compiling gas problems. The ideal is to keep your furnace as close to the melting temp of the aluminum as possible and not overheat. Also, you need an "oxidizing" flame, not a "reducing" flame. A reducing flame will force the metal to take on more gas in its matrix than it normally would. Also, degassing does not work well "outside" the furnace. I do mine inside the furnace when I know I'm slightly above pouring temp (with the flame off). After skimming, I lift the crucible and pour. You want your metal to pour like cream milk, not like mercury. There should be a sleeve formed at the lip of your crucible down to the pour cup that the aluminum flows through, this is evident you at that most perfect pouring temp.
Proper gating is also critical in eliminating gas or air bubble entrapment. If your sand mix has too much binder then the sand mold cannot absorb any off gassing of the melt introduced and becoming chilled. Situations like this will generally cause surface gas inclusions. What you have in that picture, however, is evident of soluble hydrogen spread throughout your entire melt. You get that occurring with a reducing flame and heating too hot.
Not sure if you are aware (and hopefully you're not color blind) but aluminum gives off a very subtle (barely noticeable) pinkish hue when the melt is at it's maximum temp you dare bring it to inside the furnace. Also, do not skim your melt while the furnace is running, nor skim after each ingot of scrap you drop into it once it melts. Leave the skin on till you're ready to degas and remove the skin... i.e., right before you pull the crucible and pour. When you pull the crucible there should still be that pinkish hue to the melt (not talking about the crucible here, only the melt). If it's still got that hue, sloooow down. Relax... take your time. That hue will disappear quick enough and at that point make your pour. Still, don't rush. If your gating and sand are right, and you've had a proper flame inside the furnace during the melt, chances are you will not need to degas. If you feel you have to degas due to a variety of scrap you've been melting use this... go to the grocery store and buy a couple of them "blue" toilet bowl cakes that turn your toilet water blue. Break off a thumbnail size piece and insert it into the end of a perforated length of steel thin wall pipe attached to sturdy metal rod stock. While the melt sits in a glowing hot furnace, insert the perforated pipe through the melt's surface skin and gently swirl it about. It will boil vigourously and emit smoke and the smell of spent firecracker powder. Breath shallow, or wear a respirator, or do this with some cross ventilation. When the boiling and bubbling stops, skim, lift the crucible and, if there's no pinkish hue, go ahead and pour.
Other than that, I recommend you determine whether you have too much binder and/or oil, in your sand. Often people with limited experience in making sand molds will keep adding binder till their sand packs firmly like clay. Yes, it gives them nice molds that don't damage that easily but it plays hell with the melt once entered inside the mold cavity.
Frank
The overheating I know for a fact is happening, for some reason I can't seem to get a handle on the pot temp even when using a probe.
The melting dirty metal is a know fact around here as I don't take the car wheels that I get given to me to the car wash and hose them off. but do try to melt the metal first in a pour that I know the porosity won't matter. then ingot the rest that is left over so its clean for the next melt.
Blue cakes you talking bout the ones you drop in the tank, the stuff I have should do the job but some times it bubbles and some times it doesn't may be my method of application,
Burner I normally when I light the furnace and take it up to operating temp I turn the burner up till the flame is coming out the top them put on enough air to pull the flame back inside, which should put it in and oxidizing burn.
Weather is sorta on the screwy side right now and I don't really have anything to pour but am working on a new pattern that will be done in a day or two.
David
David and Charlie aka the shop monster
If life seems normal your not going fast enough" Mario Andrette
If life seems normal your not going fast enough" Mario Andrette