my first try at a rubber mold

Where function is king.
dallen
Posts: 2321
Joined: Sat Jun 04, 2011 9:06 am
Location: Oklahoma

my first try at a rubber mold

Post by dallen »

here is a photo of my first attempt at making a silicon rubber mold from materials that I purchased from Smooth On Products,
first-wax-mold-and-casting2.jpg
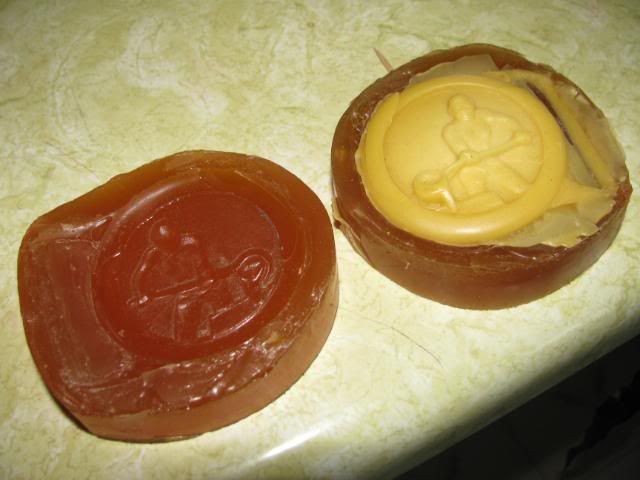
the part is one side of a pistol grip from a Russian PPS 43 SMG, I made some of these using the original scales as patterns but wasn't happy with the quality of the castings that I got, the checkering lacked a lot of detail. as can be seen in the photo the detail has been picked up in the rubber mold and would probably be a lot better if I had of degassed the rubber after filling the mold box, but the vacuum gods weren't nice to me and I couldn't get things to work correctly.

The wax I used was Filigree Pink flake from Freemans supply sold by someone else, to fill the mold I used a large (very large) syringe that I purchased at the feed store.

so now to invest the part, I have a bag of HydrCal anyway thats what the place called it were it came from. anyone have any tricks or magic potions that will help?.

DA
David and Charlie aka the shop monster

If life seems normal your not going fast enough" Mario Andrette
User avatar
Jammer
Posts: 1496
Joined: Thu Jun 02, 2011 4:04 pm
Location: Ohio

Re: my first try at a rubber mold

Post by Jammer »

I don't know anything about HydroCal. Part looks pretty good. Did you happen to see the "Bombs Away" method of degassing silicone? Basically just mix in a paper cup and poke a hole in the bottom and let it drizzle down to the mold from about 3 feet up. Might be messy if your not a good shot.
The great thing about wax is you can alter the casting however you want, just carve your initials or any pattern you want into the wax before investing.
quando omni flunkus moritati 8-)
dallen
Posts: 2321
Joined: Sat Jun 04, 2011 9:06 am
Location: Oklahoma

Re: my first try at a rubber mold

Post by dallen »

bad thing about doing it this way is the mold making materials cost an arm and a leg, a 2 pound kits is with shipping around 35 dollars, the nice thing is that they have a long shelf life.

but there are some youtube videos of people using regular clear silicon caulking to make molds with, so I'm going to try that.

I have a Vac pump was just toooooo lazy (cheap) to go to hardware store and get the stuff I needed to use it to degas with for a first time try.

DA
David and Charlie aka the shop monster

If life seems normal your not going fast enough" Mario Andrette
User avatar
Jammer
Posts: 1496
Joined: Thu Jun 02, 2011 4:04 pm
Location: Ohio

Re: my first try at a rubber mold

Post by Jammer »

If you use the silicone in thin layers and let each layer cure before adding the next, it will work. If it's too thick it won't cure right. There was something on Ask or "How to" sites that had a formula for a thin silicone you make from the caulking silicone. I'll have to look for it, I lost the link.
quando omni flunkus moritati 8-)
dallen
Posts: 2321
Joined: Sat Jun 04, 2011 9:06 am
Location: Oklahoma

Re: my first try at a rubber mold

Post by dallen »

I watched one youtube video where the guy squeezed out a whole tube of clear silicone and then thinned it with solvent but I didn't catch the type and he had to put it on in layers which would work because I could then cover it with fiberglass to stiffen it up, but I'm really liking the mix and pour stuff to make the mold with.

If I buy some more I'm going to try the urethane rubber which cures a lot faster then the the stuff that I used to make this mold with.

Anyway its something to do while stuck in the house with it being cold. I did get out Saturday and did some testing of a pump I had that I wanted to use to pump oil to the nozzle in my burner, but I'm back to the drawing board on that little project.

But any info you might run across will be welcomed with open eye's.
DA
David and Charlie aka the shop monster

If life seems normal your not going fast enough" Mario Andrette
Rasper
Posts: 630
Joined: Sun Aug 07, 2011 4:05 pm
Location: Huatulco, Oaxaca, Mexico
Contact:

Re: my first try at a rubber mold

Post by Rasper »

To use silicone caulk as a mold material I stir in some corn starch and thin it with naphtha. The corn starch transfers water into the mix which is what cures silicone caulk. It is not an ideal material. Shrinks a good bit. It's best to use the Smooth-On stuff for important work, but for small misc. pieces it works.

If you are going to use Hydrocal as an investment mold for lost wax you will want to add some sand to it or it will crack when you burn it out. I use one part plaster to two parts sand. Burn it out at 900 to 1000 degrees for a good while. I burn out 9 inch dia. X 12 tall molds for two days.

Richard
User avatar
Jammer
Posts: 1496
Joined: Thu Jun 02, 2011 4:04 pm
Location: Ohio

Re: my first try at a rubber mold

Post by Jammer »

That sounds like the recipe I had seen. I remember it had cornstarch.

I've used some Polyurethane rubber from http://www.polytek.com/ . I costs a little less and seems to work pretty well.
Image
quando omni flunkus moritati 8-)
dallen
Posts: 2321
Joined: Sat Jun 04, 2011 9:06 am
Location: Oklahoma

Re: my first try at a rubber mold

Post by dallen »

Jammer I looked at the site you linked to, their prices are pretty much the same as all the other places I've looked at for material. problem is that the stuff is just expensive.

The problem I have is that the two parts that I want to mold and cast is I used almost the complete sample kit that I got from Smooth On to make one mold. But I guess thats the breaks in this game, I'm going to get a tube of silicone caulking tomorrow and see about thinning it with some Naptha, found the video I watched the other day and thats what he used. and see about thinning some out to get a skin coat on the other part and try that see how it works out.

DA
David and Charlie aka the shop monster

If life seems normal your not going fast enough" Mario Andrette
Rasper
Posts: 630
Joined: Sun Aug 07, 2011 4:05 pm
Location: Huatulco, Oaxaca, Mexico
Contact:

Re: my first try at a rubber mold

Post by Rasper »

If you are going to use Hydrocal as an investment mold for lost wax you will want to add some sand to it or it will crack when you burn it out. I use one part plaster to two parts sand. Burn it out at 900 to 1000 degrees for a good while. I burn out 9 inch dia. X 12 tall molds for two days.
I thought after I wrote this that you will most likely be pouring this in aluminum, not bronze. Plaster molds are more forgiving for aluminum. You may be able to use the Hydrocal straight, without sand. And to burn it out less. I don't know this from experience—I only pour bronze—but I have read that you only have to burn out the free water and not the chemically bound water when pouring aluminum.

Anyway, the great thing about rubber molds and wax is that you can make a bunch of waxes and pour them all in the same investment. Wax and plaster are cheap.

Richard
dallen
Posts: 2321
Joined: Sat Jun 04, 2011 9:06 am
Location: Oklahoma

Re: my first try at a rubber mold

Post by dallen »

for what this part is Bronze would actually be too heavy, pretty but heavy although I may make a set just so I can be the only kid on the block with bronze grips on his pistol. of course with the pattern being wax a lot of the weight could be removed so that they wouldn't be so thick.

But back to the actual reason for this excursion into madness of a different breed is to learn something new. And like you mentioned if I work it out I can do a bunch at one time, I actually used the originals that I made the rubber mold off of to do some sand molds but the texture just wasn't there in the checkering like I know it can be with casting done this way.

And your right I will do them in aluminum so I may not have to do a burn out but I don't really feel like taking chances with the first couple of times I do this, rather get the disapointment of a really messed up pour a little further down the path way of casting. and not knowing about the plaster and sand I didn't put any in the mix so this one I know is already screwed because the pattern slipped in the container and I think the edge is up against the side of the container that I used to pour the plaster it.

ONE Question I have is how thick/thin do I mix the plaster, which i think is hydrcal 30 from US Gypsum, no name on the bag and I wasn't the one that purchased it. Do I mix it up sloppy thin or make it thick as my momma used to make gravy, thick enough to tear a biscuit in half.

Anyway its something to do while its to damn cold to do anything like melt metal outside around here.

DA
David and Charlie aka the shop monster

If life seems normal your not going fast enough" Mario Andrette
Post Reply