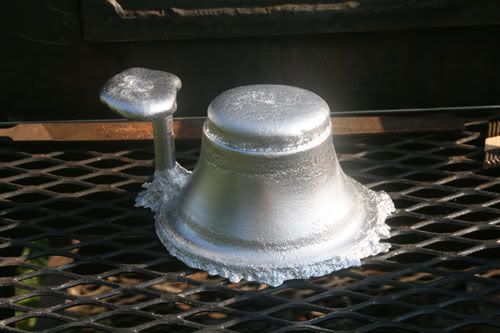
This is a shot of a part that I finally was able to get something molded up, not very good, but it did make it thru the pour. Of a part that I needed for a coffee roaster that I have been working on for I don't know how long.
A little deeper cope with a part like that maybe. Looks like you poured it open to the air around the rim on top? Like Nudge said though cleaned up nicely.
We roast our own beans too, I bought the wide an iRoast2 a few years ago and we havent bought processed coffee since.
I'd rather laugh with the sinners than cry with the saints the sinners are much more fun... Muller
your right it was poured with the top open, on this one and the first one that I did, one differance between the two is size. The first one I poured was molded in Sodium Silicate/Sand, I thought long and hard and that was the only way that I could seem to think of that would work. The part pictured in the first post was done in greensand. I tried on Sunday to mold it the conventional way of ramming it up in one half of the Flask, then flipping it over and ramming it into the other half, this didn't work due to irregularities in the shape of the pattern.
So on Monday I tried again, this time I moulded the outside of the pattern first, then I loosened the pattern and removed it, so that I could ram up the inside of the pattern. The Drag was then filled and rammed up and leveled off. I then put the pattern back into the Cope, fitted the drag back onto the Cope flipped everything right side up, removed the Cope which left the pattern sitting on top of the drag, removed the pattern and refitted the Cope. At this point I had a very rough mold that I didn't know if it would hold up to pouring metal into. Its obvious that it did.
There were a lot of problems that I had with making this part even the first time when the pattern was more complicated due to a very sharp edge on the large diameter. The First part which was made several months ago to fit a 6" tube was molded in sodium silicate, and sand, hardened with CO2. It took me two tries to make that mold work.
The below link shows four pictures of the part that I made on Monday and the first part along with a couple shots of the SS/Sand mold for the first Larger part. there is one side view of the pattern as it was when the first part was made, it shows the sharp edge that ai mentioned earlier. This was made from gluing up PVC Pipe Bushings then turning it on the lathe to a shape that would work for what I was trying to do. Which was to fit a 6" dia. Pyrex Tube onto this
So are they hot air roasters? Do you use a heat gun to run them or are they on the BBQ for more reasons than I am thinking? The roaster we have is like the popcorn popcorn converts but it is programmable for different profiles... a little fiddling and we got a roast down we liked. Just 1/4 lb at a time but thats good for us, what is the batch size on yours?
You know there is some market out there for roasters, is this something you are thinking of producing or just doing it because you can?
I'd rather laugh with the sinners than cry with the saints the sinners are much more fun... Muller
Harry, hi, nice to meet another Roaster,
In answwer to your questions, I use the Smoker to take a lot of pictures on, and to cook BBQ in, and thats where I park everything when I am roasting coffee.
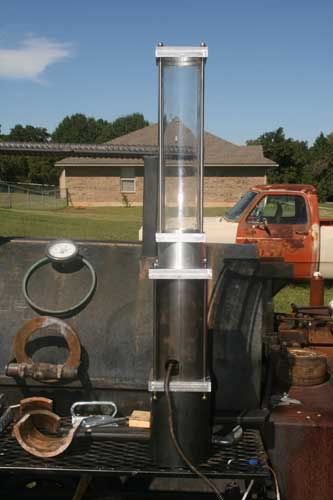
The two parts of the bottom section have had a few changes made to since that picture was taken. The bottom section is still the same which is 5 inch DOM tubing. with a Vacumn Cleaner mounted in it. The section above in the picture is 4.75 Tube that was going to be the total bottom section with a heating coil mounted on it, this worked fine untill the heating element burned out.
After trying to mount the elements that I am using now in what was essencially an open enviroment which casued them to keep buring out. I changed it out for a piece of tubeing the same size as the motor section, throwed away my original idea of mounting the heating element for one that has the two heating elements mounted inside of two 6" long pieces of 1.75 stainless steel tubing tack welded into to plates that hold them in place. this is a very snug sliding fit into the top section, now all the air has to pass over the coils. This stopped the coils shorting out, but I was having problems with the air stream getting hot enough, I finally hit on a preferated plate that held enough back pressure with the 6" pyrex tube that I was able to roast coffee in a reasonable time of 15 minutes.
I didn't like the size of the 6" tube due to several reason that I won't mention here. I ordered a 5" pyrex tube, this tube looks more reasonable when on the roaster, and will handle as much as the 6" tube.
This brings me to the part shown in the first picture. I needed a new bottom transition part to mount the Pyrex Tube on. When finished and complete there will be four stainless steel rods that will conncet the top plate to the bottom transition, with wing nuts on them for easy removal for cleaning. The tube collects a lot of oil and chaff so easy removal is needed.
When I started building this roaster I wanted to be able to roast over a pound in it, the 3.75 inch tube would handle that size of a batch, problem was that during the roast the beans expand from the thermal reactions that take place in the beans. They would start binding up on the tube wall causing circulation problems, the beans would roast fine, plus they would expand untill they almost filled the tube no room for a larger batch size.
When I received the 6" tube, I was at a lost as to what to make the pattern out of, I am not much of a woodworker, have limited woodworking tools, I had messed around with a lot of differant PVC fittings making transitions for furnace burners cause they were cheap. So I got to thinking if I could find some type of PVC bushing that the tube would either slide on or over most of the work would be done on the pattern. So I started looking and finally hit on the 6 to 4, to 4 to 3, to a 3 to 3. this gave me a big hunk of plastic that I had to turn down and fill in some gaps and holes that were in the PVC.
I moulded the first part for the 6" in Sodium Silicate and Sand i n a two part mold, this was placed in a box and covered in sand to hold it together, I should of wired to mold shut.
The second part was molded in greensand, it was done as a three piece mold. I was very glad that the part turned out. I know its not very pretty and has flash hanging all over the bottom edge. It machined ok, the metal cut like it was grainy I didn't use a lot of coolant on the part, mostly some stick wax lube that I like due to it being mostly smell free, but can be hard to use in some positions.
This was built to see if I could actually do it, I got into the hobby machinist gig, along with the Home Metal Casting I like and enjoy both of them. This was started to see if I could actually do it.
I would say that I have accomplished with ai started, even if it still needs some finishing work.
No I have no intentions of trying to sell roasters. If someone wants to build one like this I will be happy to give guideance on how I built mine. I am hoping to be able to roast 2 pounds in this thing, I know a guy that has one similar that he says will do a kilo, which is close to 2.5 pounds. I don't need that large of a batch size just be nice to know that I can if I want to.
David
Last edited by dallen on Wed Jun 08, 2011 7:38 pm, edited 1 time in total.
David and Charlie aka the shop monster
If life seems normal your not going fast enough" Mario Andrette
Hi GypsyTinker, I made the pattern out of PVC and filled in the gaps and made all fillets out of bondo. Stuff works pretty good for a pattern making but makes one heck of a mess when machining, tools need to be razor sharp.
David and Charlie aka the shop monster
If life seems normal your not going fast enough" Mario Andrette
David, we love our fresh coffee. From Jamaican To blue bell mountain beans they all have a great taste, just a little something special in fresh you dont get in processed beans.
A lb batch is a pretty good size for making beans for home use, much more than that and uless you drink a whole lot of coffee and they go beyond their optimum freshness.
So basically this is a hot air popper, nice. I have never used any other types but I know this works well, the one thing you have to be able to do is roast them rather than baking them and these do a good job of that.
Since you are not looking to market the pieces for this maybe it would make a good feature page for the site, kind of how to for the whole build for making you own coffee roaster for the metal caster.
This is the kind of thing I think would really be great to fill the site out with as time goes by.
I'd rather laugh with the sinners than cry with the saints the sinners are much more fun... Muller
I really don't think that if I tweaked this thing and cut every corner I could that I could get this thing into a price range that your average home roaster would want to pay for it, then again I may be looking at a gold mine and not know it.
I would have to set down a evaluate it from every angle that there is, cut and shave parts to the minimum to save cost, from what I alreay know the Pyrex is twice as long as it needs to be, and the stuff cost and arm. That 5 inch by 16 inch tube is almost 75 bucks. I still don't know be a lot of work to put it on the market, to sell a kit and someone else put it together, with them having to source some of the parts and such be a lot easier.
to make it into a page for the site, I'm not a writer and damn sure not a technical one, but I do think it is a good build and actually an easy build for someone that has the tools and the want too, and loves coffee.
And yes I can and do drink up more than a pound of fresh roasted coffee and what I don't there are a few friends that I give what is left over from when I return from a job that I have been on for 2 or 3 weeks, say its the best damn coffee they ever had, so its not wasted.
I am home now and plan to have the new parts installed and some bailing wire to hold this thing together till I get the new clamps installed ( there is a lot of air pressure under that roast chamber) I plan on doing a Roast and videoing it this weekend and will post the link here so you can get a glance at this thing in action.
Last edited by dallen on Fri Jun 10, 2011 6:34 am, edited 1 time in total.
David and Charlie aka the shop monster
If life seems normal your not going fast enough" Mario Andrette