
I guess leather would work good for filets. Glueing them might be a hassle.
Have you tried to cut wax with that plane? Might make nice wax filets if it's soft enough.
My Hand Planes
Re: My Hand Planes
quando omni flunkus moritati 
Re: My Hand Planes
nah, I just use round wax rods and use heated fillet irons to melt it into the corners and shape the fillets that way, then scrape them in. If I made it using the profile of the leather fillets, it wouldnt have enough material to melt into the corners and actually form a fillet tbh. I could make an extruder to make actual wax fillet profile for my extruder, but I really dont see the need since the normal round rods works so well tbh.
By melting it into the corners the way I do, you usually add a seal coat of shellac to the pattern first, then apply the wax fillets after that, which the wax melts and mixes with the shellac a tiny bit, and partially soaks into the wood too, so no matter what the wood does, it will never come loose or change profile of the fillets over time and as the wood moves.
By melting it into the corners the way I do, you usually add a seal coat of shellac to the pattern first, then apply the wax fillets after that, which the wax melts and mixes with the shellac a tiny bit, and partially soaks into the wood too, so no matter what the wood does, it will never come loose or change profile of the fillets over time and as the wood moves.
Re: My Hand Planes
I've been going to make a wax extruder like yours but I really haven't needed one yet. Shoot, I can't even find my drill, I put it somewhere and been looking for it for a week. I guess I'll have to move the junk.. I mean valuable items, out of the garage to see where I put it. 
quando omni flunkus moritati
Re: My Hand Planes
Yea, I was planning on making a new tip/plug for mine and instead of 1/8" hole as the normal one uses, I was going to make one with a series of 1/16" holes in it, that way it'd make multiple really small rods all at once for doing really small fillets and such. I was going to make up some really small fillet balls/irons for smaller details and such, like one using BBs from a BB gun for doing tiny fillets for between patterns and match plates, and places you dont want or need a bigger fillet at.
I have steel ball bearings of different sizes that Ive scavanged from different things, so I'd just make a few of different sizes. I usually just heat them up with the torch till they're orange hot, then sit them off somewhere to cool down slowly, then I can stick them in the lathe to drill into them with a center drill, which the one I usually use has a 1/8" or 3mm pilot on it, so that fits nicely on the guide rails from old computer cdrom drives or metal coat hangers, lol. I just silver solder them on, which is easy enough to do with stuff that small tbh.
That extruder has worked itself to death a few times now but I just keep fixing it and it just keeps going and going, I just need to find somewhere to get some more dark brown wax like the stuff I got from you. That stuff is like gold, and noone seems to either have it or wants to give it up, lol.
Re: My Hand Planes
Well, Im pretty much out of planes to make, so I bought one of the stanley trim planes to play with, which you find for around $10, one of these things:
https://www.stanleytools.com/product/12 ... ming-plane

It just looked to be such crap and I thought it would be interesting to try to improve it and turn it into an infill plane, lol. The mouth is pretty large on it, but it still works. The blade was garbage, the thumbscrew kept digging into it because it was so soft. It would retract the blade back to the same position, and since all of the parts were just die cut, there was no bevel angles on anything, so I took a file and started filing everything to how it should be. I made a new blade for it out of a piece of HSS power hacksaw blade that I had, took the belt grinder to it to reshape it, then took it to the wire wheel to remove all of the black powder coating junk that was on it.
I had a piece of cherry that I got from the firewood pile last summer, so I cut a small piece off of the board that was from that and made some infill from it. The grain was so crazy in the piece of wood that when I put some BLO and shellac on it, it didnt even look like wood anymore, and just looked like polished granite/stone almost, but it just has a ton of cat's eye effect to it.
I have no idea what to do with it, but it's around 3" long now, 1" wide blade, and was just something to play with really, lol. Yea, it was one of the ugly trim planes, but with a little reshaping of it, it turned out pretty nice looking and is far more comfortable to hold/use now.
https://www.stanleytools.com/product/12 ... ming-plane
It just looked to be such crap and I thought it would be interesting to try to improve it and turn it into an infill plane, lol. The mouth is pretty large on it, but it still works. The blade was garbage, the thumbscrew kept digging into it because it was so soft. It would retract the blade back to the same position, and since all of the parts were just die cut, there was no bevel angles on anything, so I took a file and started filing everything to how it should be. I made a new blade for it out of a piece of HSS power hacksaw blade that I had, took the belt grinder to it to reshape it, then took it to the wire wheel to remove all of the black powder coating junk that was on it.
I had a piece of cherry that I got from the firewood pile last summer, so I cut a small piece off of the board that was from that and made some infill from it. The grain was so crazy in the piece of wood that when I put some BLO and shellac on it, it didnt even look like wood anymore, and just looked like polished granite/stone almost, but it just has a ton of cat's eye effect to it.
Re: My Hand Planes
Well, as usual, Ive been working on my hand planes again, lol.
I was woking on a set of planes called side rabbet planes, which go down into a slot and lets you take a few thou shaving off of the side of the slot to open it up little by little and make it wider till you get the fit that you want. Ive seen alot of coreboxes that are pieced together and have slots that the outsides of the core sits into those cores, but for me, my table saw is not precise at all for cutting slots and adjusting the width of cut. I have alot of boards that are non nominal sizes, so a router bit might get close, but you end up getting a slot that is too wide or too narrow, Thats where these planes would come in, you go slightly undersize, then you can take a few passes till you get a nice snug fit between the two. A too loose of a slot would allow sand to get into it and wear everything out pretty quickly, and also jam up the corebox or make it so tight that the core would get damaged trying to get it out.
This is what I was after, the stanley 98 and 99, which is a pair of planes, one for left hand, and one is right hand, that way you can work the grooves and not have to worry about going against the grain. Ive seen this set of planes go for between $150-$200 for the matched pair, so as usual, I decided to make a set myself, lol.
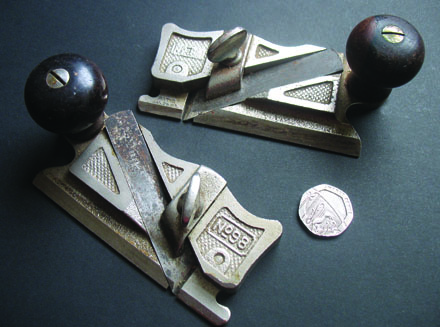
This is where mine has started, I had some 2" wide, 1/4" thick steel flat bar that was being moved around between the shop and casting/forging shed for a while, so I cut it to the sizes I was after on the power hacksaw, that way it was all perfectly square and smooth, then I stuck the steel in a container with some cleaning vinegar for a few days, which eats the mill scale off of it and what's left, you just wipe off with a wire brush. I then used a few dabs of CA glue on the pieces to hold them together while I was laying out and working on them.
The steel was laid out, and the longer pieces were glued 3/4" above the bottom of the other pieces, using a spacer board that was planed perfectly parallel and to height, then the excess 3/4" on the top was cut off and put back for other projects. I then drilled 3/16" holes in key locations, some were done for tapping size for 1/4"-20 threads, and the others were countersunk with large countersunks in places that wouldnt interfere with the slots for the blade and clamping finger. I then took the angle grinder and belt sander to cut the profile of the plane out that I was after.
The 98 and 99 above, they have a 1/2" wide cutting depth, which seemed a bit shallow to me since I do alot of stuff with 3/4" stuff, so I made mine so it has a 3/4" max deep cutting depth.
I was woking on a set of planes called side rabbet planes, which go down into a slot and lets you take a few thou shaving off of the side of the slot to open it up little by little and make it wider till you get the fit that you want. Ive seen alot of coreboxes that are pieced together and have slots that the outsides of the core sits into those cores, but for me, my table saw is not precise at all for cutting slots and adjusting the width of cut. I have alot of boards that are non nominal sizes, so a router bit might get close, but you end up getting a slot that is too wide or too narrow, Thats where these planes would come in, you go slightly undersize, then you can take a few passes till you get a nice snug fit between the two. A too loose of a slot would allow sand to get into it and wear everything out pretty quickly, and also jam up the corebox or make it so tight that the core would get damaged trying to get it out.
This is what I was after, the stanley 98 and 99, which is a pair of planes, one for left hand, and one is right hand, that way you can work the grooves and not have to worry about going against the grain. Ive seen this set of planes go for between $150-$200 for the matched pair, so as usual, I decided to make a set myself, lol.
This is where mine has started, I had some 2" wide, 1/4" thick steel flat bar that was being moved around between the shop and casting/forging shed for a while, so I cut it to the sizes I was after on the power hacksaw, that way it was all perfectly square and smooth, then I stuck the steel in a container with some cleaning vinegar for a few days, which eats the mill scale off of it and what's left, you just wipe off with a wire brush. I then used a few dabs of CA glue on the pieces to hold them together while I was laying out and working on them.
Re: My Hand Planes
I then took some 3/16" steel rod and cut the sizes I needed for the rivets and started to peen the rivets down into the countersunk holes to fill them up, then any excess would be peened over to make sure the holes were completely filled in and the double sided countersunk rivets made it so the plane body would never come apart again.
After that, the rivets were ground flush on the belt sander and lapped both front and back so they were nice and flat, which made said rivets completely dissappear.
After that, the front toe's glue joint holding it together was broken loose and the knocked off and cleaned up, then both were set up on the mill on an angle plate, one at a time, and the slots for the blades were cut out in the planes. The bed angle is 8 degrees, and the skew angle of the blade is at 30 degrees, then one slot cut in a little over 1/8" deep going vertical just behind the mouth for a clamping finger to hold the blade in place.
Re: My Hand Planes
After that, I was looking to see what to use for knobs on the planes, which I kinda wanted something that goes with my "patternmaker's tools" theme, which I like to use woods that normally are used for patternmaking, which I had the leftover pieces of very old genuine mahogany that I used on the miter plane, so I drilled out the blocks and stuck them on the wood lathe, and turned the two knobs.
The bolts dont have slots in them like usual, which I was wanting more of a shallow domed bolt that matched the profile of the wood for the knobs, which I couldnt find anywhere, but I was looking around and found some carriage bolts that was already nickel plated and looked right with the wood for the knobs, so I countersunk into the tops of the knobs till they just sat at the right depth, then tightened down into the tops to force the square part into the wood and lock them in place. Now to remove the knobs, you just turn them to unscrew them.
As you can see in between the planes, I have two pieces of bed frame ready to be ground up to be used for the plane's blades, which as you probably know by now, I like using bed frame for plane blades, and it keeps an edge for a very long time after being hardened and heat treated, lol.
The knobs are turned in a way that the light just shimmers off of the wood and it has a very strong cat's eye/chatoyance effect to them.
https://www.youtube.com/watch?v=lFAOcIZ4i7U
After getting the knobs done up, I went searching for something to make the clamping fingers from, and while searching in the garage, I found this 3 1/2" x 3 1/2" x 3/8" thick angle iron, which I laid out 60 degree lines slightly larger than I need for the clamping fingers.
The bolts dont have slots in them like usual, which I was wanting more of a shallow domed bolt that matched the profile of the wood for the knobs, which I couldnt find anywhere, but I was looking around and found some carriage bolts that was already nickel plated and looked right with the wood for the knobs, so I countersunk into the tops of the knobs till they just sat at the right depth, then tightened down into the tops to force the square part into the wood and lock them in place. Now to remove the knobs, you just turn them to unscrew them.
The knobs are turned in a way that the light just shimmers off of the wood and it has a very strong cat's eye/chatoyance effect to them.
https://www.youtube.com/watch?v=lFAOcIZ4i7U
After getting the knobs done up, I went searching for something to make the clamping fingers from, and while searching in the garage, I found this 3 1/2" x 3 1/2" x 3/8" thick angle iron, which I laid out 60 degree lines slightly larger than I need for the clamping fingers.
Re: My Hand Planes
Well, I was going to cut up those clamping fingers, but kinda went on a side tangent again and still havnt cut them out yet, lol.
I was looking up these planes here and really admiring how they were put together, for the shape and everything.
https://www.jimbodetools.com/products/s ... anes-86001
I was looking at the fact that the handles were pretty much an even thickness throughout, and it had a nice gentle curve that fit well into your hand. Ive seen the same parallel thickness design on things like spokeshaves and such, and really got to thinking how in the world did they make the pattern for those things, lol. After a few days of looking to see if I could find any info at all, I was sitting here looking at my one spokeshave and turned it upside down, then it finally hit me... I felt like such an idiot really, lol.
The handles on them were nothing but elongated and skinny spoons, so that sent me down a bit of a rabbit hole of carving wooden spoons, which I had previously looked into, but there was some chisels that I was missing to make things easier with it. I had forged some out last summer for my uncle, which also does spoon carving, so I knew what profile I was after, so I went out to the forge and made some simple fishtail spoon gouges along with some other chisel blanks.
The first two are the spoon gouges, which the skinny next one was re-forged into a similar gouge that was much skinnier that would get into tighter areas.
I had went out to the garage to see what I had for wood for the handles, and I had this wierd piece of what I thought was poplar, but it was waay too hard to be poplar imo, but it was insanely figured with a feather pattern. I had gotten it off of the firewood pile, and it was destined for the woodburner, which I had grabbed it off of the pile last spring and it had sat in the garage for the remainder of the summer and this winter drying out completely.
The block was cut up into turning blanks for all 3 knobs, and the rest of the wood was put away in the bottom of the one toolbox to put it back for future projects. I then turned the knobs and epoxied the chisels that I forged out into the handles/knobs, then after adding around a half a dozen coats of super blonde shellac to them, here they are.
Needless to say, they are extremely figured and play effects with the light like crazy, lol.
I was looking up these planes here and really admiring how they were put together, for the shape and everything.
https://www.jimbodetools.com/products/s ... anes-86001
I was looking at the fact that the handles were pretty much an even thickness throughout, and it had a nice gentle curve that fit well into your hand. Ive seen the same parallel thickness design on things like spokeshaves and such, and really got to thinking how in the world did they make the pattern for those things, lol. After a few days of looking to see if I could find any info at all, I was sitting here looking at my one spokeshave and turned it upside down, then it finally hit me... I felt like such an idiot really, lol.
The handles on them were nothing but elongated and skinny spoons, so that sent me down a bit of a rabbit hole of carving wooden spoons, which I had previously looked into, but there was some chisels that I was missing to make things easier with it. I had forged some out last summer for my uncle, which also does spoon carving, so I knew what profile I was after, so I went out to the forge and made some simple fishtail spoon gouges along with some other chisel blanks.
I had went out to the garage to see what I had for wood for the handles, and I had this wierd piece of what I thought was poplar, but it was waay too hard to be poplar imo, but it was insanely figured with a feather pattern. I had gotten it off of the firewood pile, and it was destined for the woodburner, which I had grabbed it off of the pile last spring and it had sat in the garage for the remainder of the summer and this winter drying out completely.
Re: My Hand Planes
As soon as the chisels were done and shellac was dry, i was wanting to play with them and just holding onto a piece of wood (first bad idea) to see how they worked in pine, and they worked great, but I was getting ready for bed and was tired, (yep, you see where this is going) and the chisel I was using slipped, slicing right through the top half of my index finger and into the knuckle of my middle finger, cutting through the skin and into the muscle in a fraction of a second. Needless to say, Im not working on any planes or anything right now for a while, but as soon as I can, Ill be out cutting and grinding the blades for the side planes to get those done, but cant do much of anything right now due to open wound...
As it goes, "To be continued..."
PS. At least I know the chisels are sharp, lol...
As it goes, "To be continued..."
PS. At least I know the chisels are sharp, lol...