Cincinnati Shaper

Re: Cincinnati Shaper
Ok back to casting metal and making a mess in the yard.
rammed up the pattern for the pulley to replace the one on the transmission with. had a little issue of it not seperating when I split the mold and a small sand tear down one edge, need to sand the dowels down some more.
Core caused a gas blow but thats my fault for not putting in some vents that would allow the gas out the back end of the core.
gas pocket from core

Inside cleaned up a little
rammed up the pattern for the pulley to replace the one on the transmission with. had a little issue of it not seperating when I split the mold and a small sand tear down one edge, need to sand the dowels down some more.
Core caused a gas blow but thats my fault for not putting in some vents that would allow the gas out the back end of the core.

gas pocket from core

Inside cleaned up a little

David and Charlie aka the shop monster
If life seems normal your not going fast enough" Mario Andrette
If life seems normal your not going fast enough" Mario Andrette
Re: Cincinnati Shaper
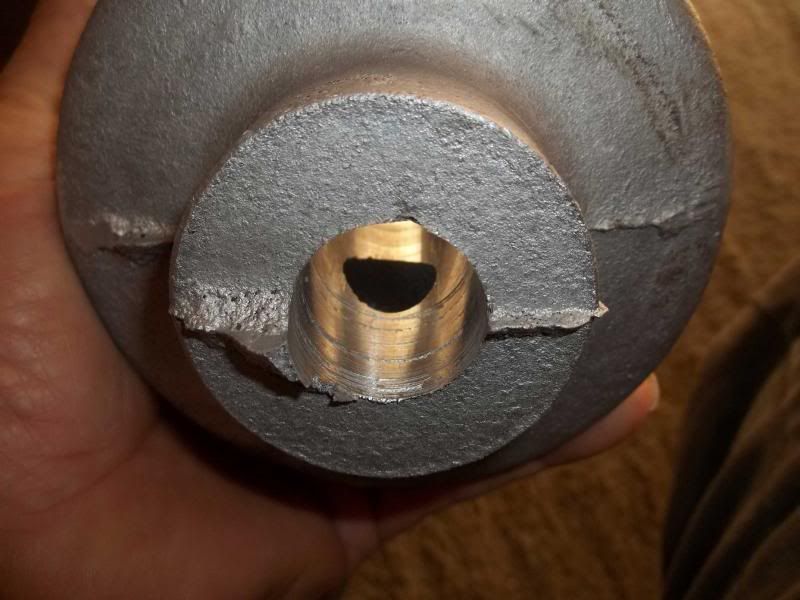
took the pulley out of the lathe this morning was going to take it and see about having the spot I showed in picture 2 above welded up. But after washing all the chips and cutting fluid out and off of it, I find what you see in todays photo. A great big hole in the bore where it goes on the shaft, so no sense in having the outside welded up if I can get the inside filled up. Plus I think the metal may of had some iron scale chips in it off of the metal ring thats in the exhaust port of the lid it's getting in pretty bad shape and scaling pretty bad from melting Cast Iron.
I guess today I will see if I can get a core made up, that instead of just one vent thru the middle of it which I used one end of to hold a graphite support rod I will try to put a couple in the outer edges of the core and have them in the top of the mold. This core is over 3.5 inches in diameter, I may even go get some stuff and try a baked core which should get rid of the gas.
This will at least give me and idea of how its going to look and if it will actually work. Plus I need to figure out what to do about a keyway, I don't have a 1/4 inch broach to cut it with.
Alright the photo

David and Charlie aka the shop monster
If life seems normal your not going fast enough" Mario Andrette
If life seems normal your not going fast enough" Mario Andrette
Re: Cincinnati Shaper
No foundry work today. I received the third capacitor that I needed to hook up the old three phase motor that was originally on the shaper when I received it. I had no idea if the motor was good or not. Anyway it had been wired up to run on single phase with capacitors feeding the third phase. The ones that were on the machine were in pretty bad shape when I received it a couple years agos and with them being out in the weather I didn't really feel comfortable trying to use them plus the start cap had I guess from water and freezing split the case and fell apart.
So I ordered some new ones and heres the results of todays labors, now if I just had a belt that was long enough.
So I ordered some new ones and heres the results of todays labors, now if I just had a belt that was long enough.
David and Charlie aka the shop monster
If life seems normal your not going fast enough" Mario Andrette
If life seems normal your not going fast enough" Mario Andrette
-
latzanimal
- Posts: 418
- Joined: Wed Jun 01, 2011 10:58 pm
Re: Cincinnati Shaper
I must have missed the big pulley or have forgotten about it. Either way it looks good....
I need a phase converter for my lathe ..... and time....
I need a phase converter for my lathe ..... and time....
Re: Cincinnati Shaper
Latz you will have to back up a couple pages if you want to see the video of the pour on the big pulley, it was a one shot pour, the first one came out good enough to use, unlike this smaller one I am trying to make.latzanimal wrote:I must have missed the big pulley or have forgotten about it. Either way it looks good....
I need a phase converter for my lathe ..... and time....
Get yourself a three phase motor thats larger then the one on your lathe and use it to made a rotary phase converter.
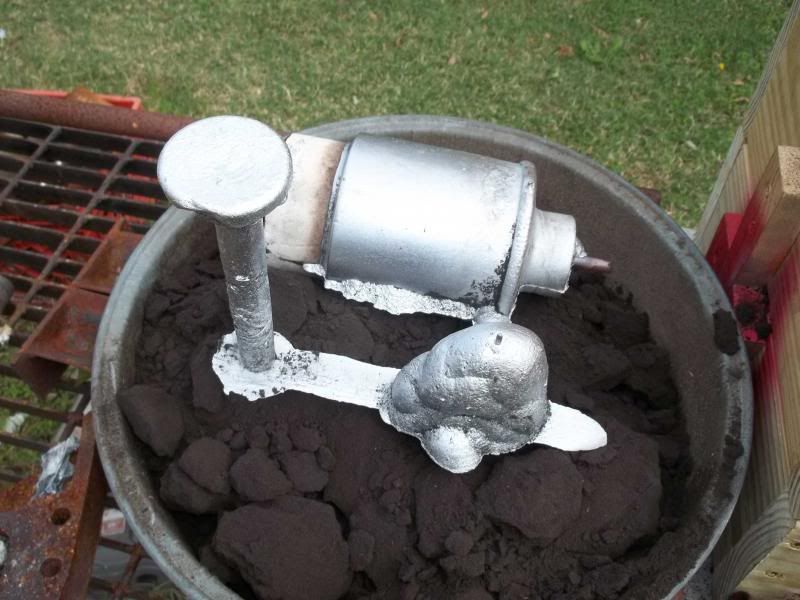
here's a shot of the second pour on the pulley for the transmission.

David and Charlie aka the shop monster
If life seems normal your not going fast enough" Mario Andrette
If life seems normal your not going fast enough" Mario Andrette
Re: Cincinnati Shaper
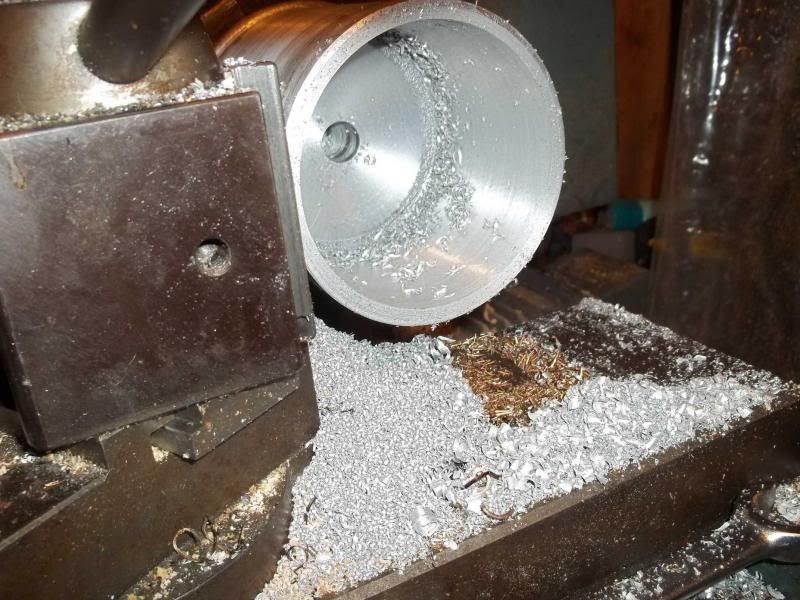
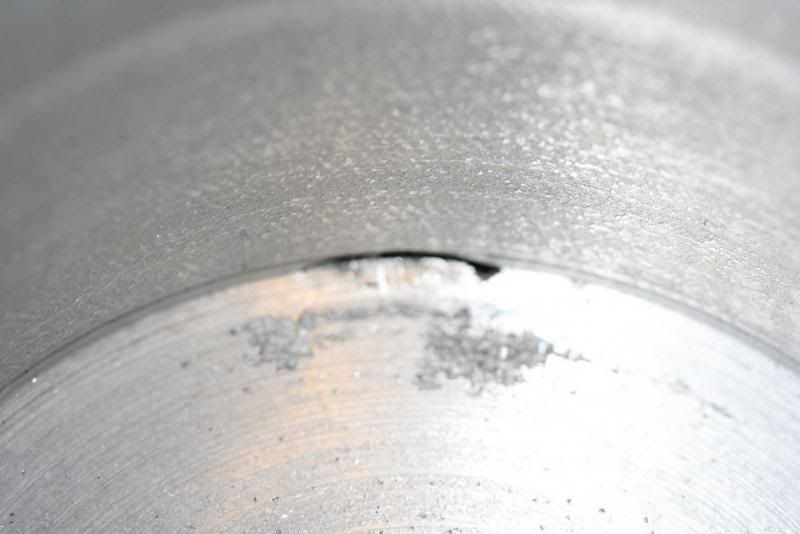
did some clean up on the pulley last night and this morning,
here it is right out of the sand and washed off
the inside, you can see where the core gas blowed thru the core and into the metal while it was still molten, cure put in larger vents in the core so route the gas to the back end of the core so it will exit out the vent hole I put in the sand.
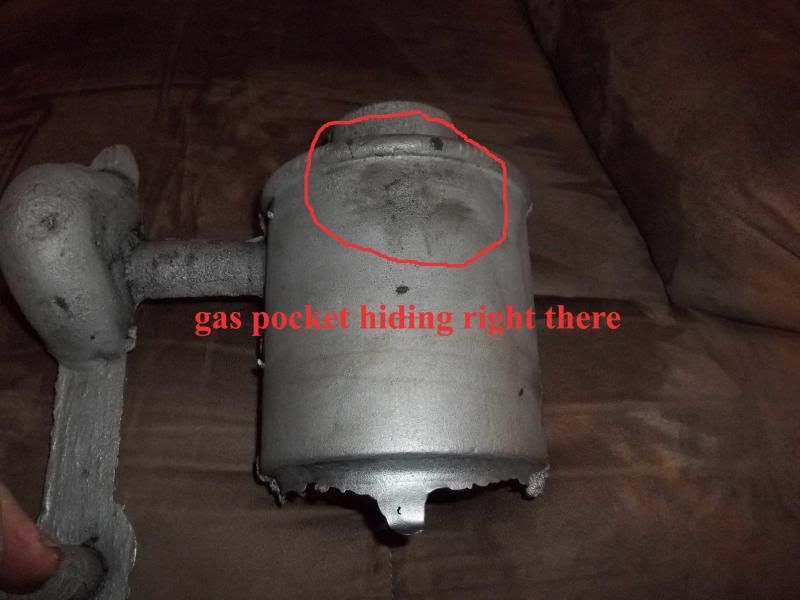
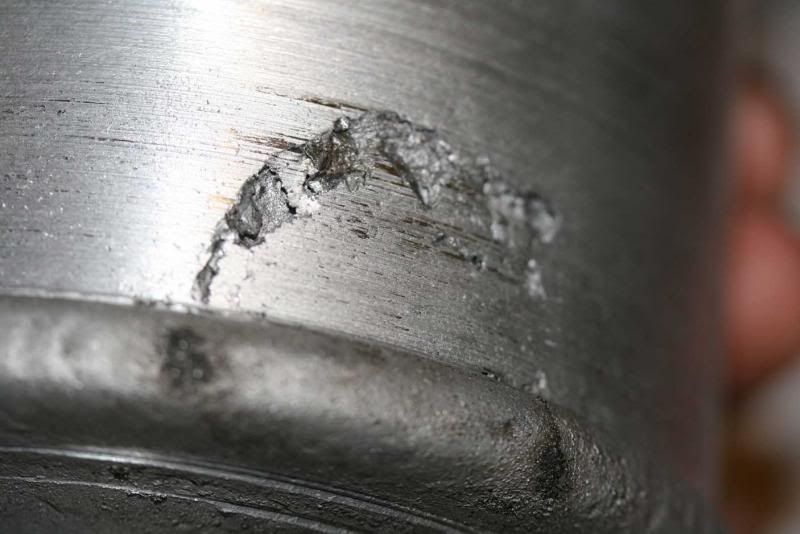
the outside, where the gas blowed thru the metal trying to vent out. I'm thinking that since this is a one off part of either filling it with some metal putty (which I have) or having it welded up and dress it down (know a guy that does aluminum welding) only reason I would pour another one is to prove to myself that I can get a solid casting without the gas problem.
here it is right out of the sand and washed off

the inside, you can see where the core gas blowed thru the core and into the metal while it was still molten, cure put in larger vents in the core so route the gas to the back end of the core so it will exit out the vent hole I put in the sand.

the outside, where the gas blowed thru the metal trying to vent out. I'm thinking that since this is a one off part of either filling it with some metal putty (which I have) or having it welded up and dress it down (know a guy that does aluminum welding) only reason I would pour another one is to prove to myself that I can get a solid casting without the gas problem.

David and Charlie aka the shop monster
If life seems normal your not going fast enough" Mario Andrette
If life seems normal your not going fast enough" Mario Andrette
Re: Cincinnati Shaper
so people don't think I made it this far with this project and stopped, I'm sorta hung up on getting a keyway in the pulley that is in the last post, I don't have a 1/4" broach and none of the people that I know has one.
hope to have the keyway done in a day or two or as soon as I figure out a way to do it. Plus I'm trying to find material to make a new drive belt with, since I flipped the transmission around the belts too short.
DA
hope to have the keyway done in a day or two or as soon as I figure out a way to do it. Plus I'm trying to find material to make a new drive belt with, since I flipped the transmission around the belts too short.
DA
David and Charlie aka the shop monster
If life seems normal your not going fast enough" Mario Andrette
If life seems normal your not going fast enough" Mario Andrette
Re: Cincinnati Shaper
A few things I see giving you the gas bubble problems.
1) turbulence is an issue in how you gated the piece. You have a carved out thickened section of your gating near the 90 deg. bend just before it enters the mold cavity. Metal passing into the sprue rushes in then slams up against the wall and sloshes upward, backward, and downward to fill that raised cavity which also traps air bubbles as a result... at that same instant metal that forced itself by has begun to fill your mold but the flow was not initially adequate nor consistent within the first second or two. As you continued to pour the reservoir filled and those bubbles got pulled into the mold cavity too and had nowhere to go but rise to the surface. Metal that entered the mold first chilled somewhat prior to the bubbles getting into the mold cavity which helped keep the bubbles nearest their entry point, directly in line and above where they entered, and not spread out more evenly along the casting's length. Turbulence should always be avoided as much as possible regardless what metal you're casting.
2) Your thickened section of the gating nearest your casting should have been carved downward, not upward. This would have better served to reduce turbulence and still given you sufficient reservoir to enable your cast to chill and not pucker or crack. Also, having your reservoir as close as to the piece possible is more preferable than as far as you had it away from your cast.
3) The best method of filling would have been to totally eliminate any bends in your gating, i.e., a direct main gate (90 degree from it's initial entry into the mold) and direct to the piece being cast. Shorter the better. YOur gating needs to be at least twice the thickness of your intended cast product.
4) to ensure potential escape of any further inclusion of bubbles trapped, you should punch a few skinny holes into the upper half of the mold surface (like you did in a couple places along the side of the cast) so if a bubble did get drawn into the mold it would have ample places to escape. This would include any gas produced from burnout of the flour and molasses that may have remained in the core after baking. It's always best to have a bunch of prickly gas vents to snip off and file smooth than not have enough, or adequate ones, located where potential air and/or gases might develop. Always study your mold cavity prior to closing and attempt to envision how metal is going to enter the gate and into the piece being cast, and to determine what to do to eliminate any potential of inclusions entering the mold cavity, and where to vent for assurance everything fills completely without air or gas being trapped inside.
Re: Cincinnati Shaper
5) And finally, when filling one end of a piece you also need to have adequate gating leading to a riser at the opposite end of the piece which would assist in drawing gas and air inclusions through the piece being cast and thus out through the riser at the opposite end.